
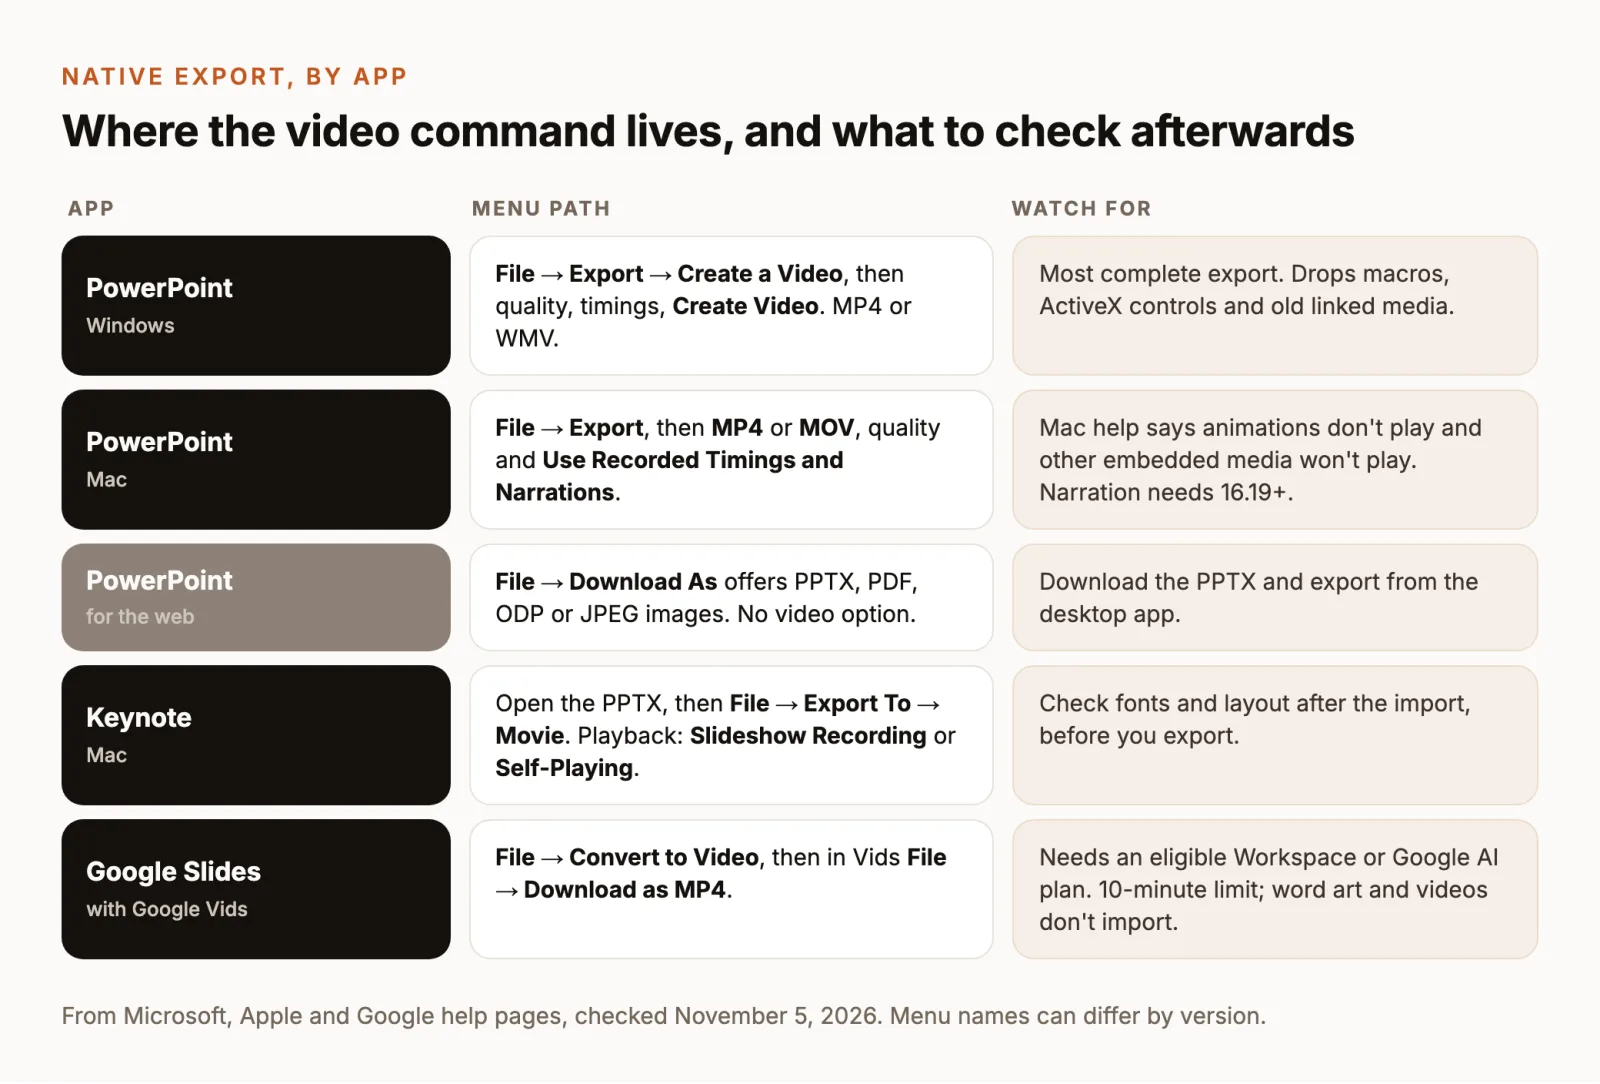
To turn a PowerPoint into a video, save the deck, then choose File → Export → Create a Video in PowerPoint for Windows, or File → Export and the MP4 format on a Mac. Pick a quality, decide whether to use recorded timings and narration, and export. You need the desktop app: PowerPoint for the web can’t save a video. Keynote and Google Slides have their own routes, covered below.
This guide covers those native exports, how to add narration first, and what each route leaves out. It ends with a different option for decks that make poor videos: rebuilding the explanation as a narrated animation. If you’re making a video from photos and music instead, our slideshow video guide is the better fit.
Choose your route
- You have PowerPoint for Windows. Use its built-in export. It is the most complete route and keeps narration, timings, animations and transitions.
- You have PowerPoint for Mac. Export works, but Microsoft’s Mac help warns that animations and embedded media won’t play in the movie. Test before you rely on it.
- You only have PowerPoint for the web. Download the PPTX and export from a desktop app, or use one of the routes below.
- You use Keynote or Google Slides. Both can make an MP4 from a PowerPoint file, with different limits.
- The deck works on stage but not on screen. Slides full of bullets make a slow video. Rebuild the explanation as an animated explainer instead of exporting it.
Turn a PowerPoint into a video on Windows
These steps follow Microsoft’s guide to turning a presentation into a video, which applies to PowerPoint for Microsoft 365 and PowerPoint 2016 to 2024.
- Save the deck. Choose File → Save so your latest changes are in the .pptx.
- Open the export screen. Choose File → Export → Create a Video. If you have the Recording tab, Export to Video opens the same screen.
- Pick a quality. The first drop-down sets the resolution (see the list below).
- Choose the timing. The second drop-down decides whether recorded timings and narration are used.
- Select Create Video. Name the file, choose a folder and pick MPEG-4 Video (MP4) or Windows Media Video (WMV) as the type.
- Wait for the status bar. PowerPoint shows progress at the bottom of the window. Microsoft notes that a long deck with media can take several hours, and you can keep working while it renders.
Choose MP4 unless you have a reason not to. It plays almost everywhere and uploads to every video platform.
Pick a quality
- Ultra HD (4K): 3840 × 2160, the largest files. Needs Windows 10 or later, and isn’t offered in the volume-license edition of PowerPoint 2016.
- Full HD (1080p): 1920 × 1080. The sensible default for screens, YouTube and LMS uploads.
- HD (720p): 1280 × 720, a medium file for email or slow connections.
- Standard (480p): 852 × 480, the smallest file.
A deck of text and flat graphics rarely gains anything from 4K. Export 1080p first, check it, and only go higher if a large screen needs it.
Recorded timings or fixed seconds per slide
If you haven’t recorded anything, PowerPoint defaults to Don’t Use Recorded Timings and Narrations and shows each slide for 5 seconds. Change that in Seconds to spend on each slide. One fixed length rarely suits every slide: a title needs 3 seconds, a chart may need 15.
For per-slide timing without narration, use Slide Show → Rehearse Timings. PowerPoint times each slide while you click through, and you can keep the timings at the end (Microsoft’s rehearsal guide). If timings or narration exist, the export defaults to Use Recorded Timings and Narrations.
What the Windows export leaves out
Microsoft lists four things that won’t make it into the video: media inserted with old PowerPoint versions (linked, not embedded), QuickTime media without an extra codec, macros, and OLE/ActiveX controls. For old linked media, use File → Info → Convert to update the deck, then export again. Anything interactive, such as hyperlinks, quizzes and click-to-reveal triggers, becomes a fixed sequence in a video.
Add narration before you export
A narrated video is easier to follow than a silent one with 5-second slides. Record the narration inside PowerPoint so it is tied to each slide.
- Open Record. In current Microsoft 365 builds, select Record in the top bar next to Share, or open the Record tab. Microsoft’s recording guide shows both entry points.
- Use the teleprompter. Teleprompter view shows the slide’s speaker notes above the preview, so you can read them while looking at the camera. Turn the camera off if you only want your voice.
- Record slide by slide. Recordings attach to each slide. If one slide goes wrong, delete and re-record that slide only; you can reorder slides without re-recording.
- Don’t talk across slide changes. PowerPoint doesn’t record audio during transitions and adds a short silence at the start and end of each slide. Finish your sentence, then advance.
- Preview, then export. Play back the current slide in the Record window. Its Export screen creates a 1080p MP4 by default; Customize Export opens the full quality and timing options.
Speaker notes don’t turn into speech on their own. PowerPoint only uses notes as a prompter; the voice in the video is whatever you record. Microsoft’s Record export page says the video keeps recorded timings, narration, animations, transitions, media, ink and laser-pointer gestures.
Export from PowerPoint on a Mac
Microsoft’s Mac instructions apply to PowerPoint for Microsoft 365 for Mac, 2024 and 2021.
- Choose File → Export. Don’t use Save As; it has no video options.
- Open File Format and choose MP4 or MOV. MP4 plays on more devices; MOV suits QuickTime and Apple apps.
- Pick a Quality: Ultra HD (4K), Full HD (1080p), HD (720p) or Standard (480p).
- Check Use Recorded Timings and Narrations if you recorded the slide show, or set the time per slide.
- Choose Export.
Two limits matter. Recorded narration is included in exported videos only from version 16.19 onward. And the Mac page says that several transitions play differently in a movie and animation effects “don’t play in a movie at all.” Microsoft’s newer Record page, which covers Mac too, describes animations in exports, so the result depends on your build. Export a short test with your heaviest slide first. If animations disappear, export on Windows or rebuild the motion another way.
PowerPoint for the web can’t export video
PowerPoint for the web saves automatically, and File → Download As offers a .pptx, .pdf, .odp or JPEG images of each slide, but no video (Microsoft’s comparison of web features). Download the .pptx and export it from PowerPoint on Windows or Mac, or from Keynote or Google Slides below.
Use Keynote or Google Slides instead
Keynote on a Mac
Keynote opens .pptx files, which makes it a free route for Mac users. Fonts and some effects can change on import, so page through the deck before exporting. Apple’s format conversion page covers opening PowerPoint files.
- To add narration, choose Play → Record Slideshow, select the record button, and press the Right Arrow key to advance (Apple’s recording guide). The recording is saved with the presentation.
- Choose File → Export To → Movie.
- Under Playback, choose Slideshow Recording to use your narration, or Self-Playing to advance on fixed intervals.
- Choose a Resolution. Advanced Options add frame rate, format and color space.
- Select Save, name the file and choose Export (Apple’s export guide).
Google Slides with Google Vids
Upload the .pptx to Google Drive and open it in Slides. Google’s video route goes through Vids, its video editor, which needs an eligible Google Workspace account or Google AI plan.
- In Slides, choose File → Convert to Video, or in Vids choose Convert Slides and pick the presentation (Google’s conversion guide).
- Select the slides. Each one becomes a scene.
- Decide on AI. With Gemini on, Vids can write a script, generate a voiceover and add music; Replace with speaker notes uses your own notes as the script. Turn it off to import plain slides.
- In Vids, choose File → Download as MP4 (Vids help).
Google’s limits: up to 45 slides with the AI features and 100 without, a 10-minute video limit, 5-second scenes when there’s no voiceover, and no word art or video files carried over. To narrate yourself, Slides also has Record → Record video with Camera & Screen, Audio or Screen modes, in Chrome or Edge on eligible accounts (Google’s recording guide).
Rebuild the deck as an animated explainer
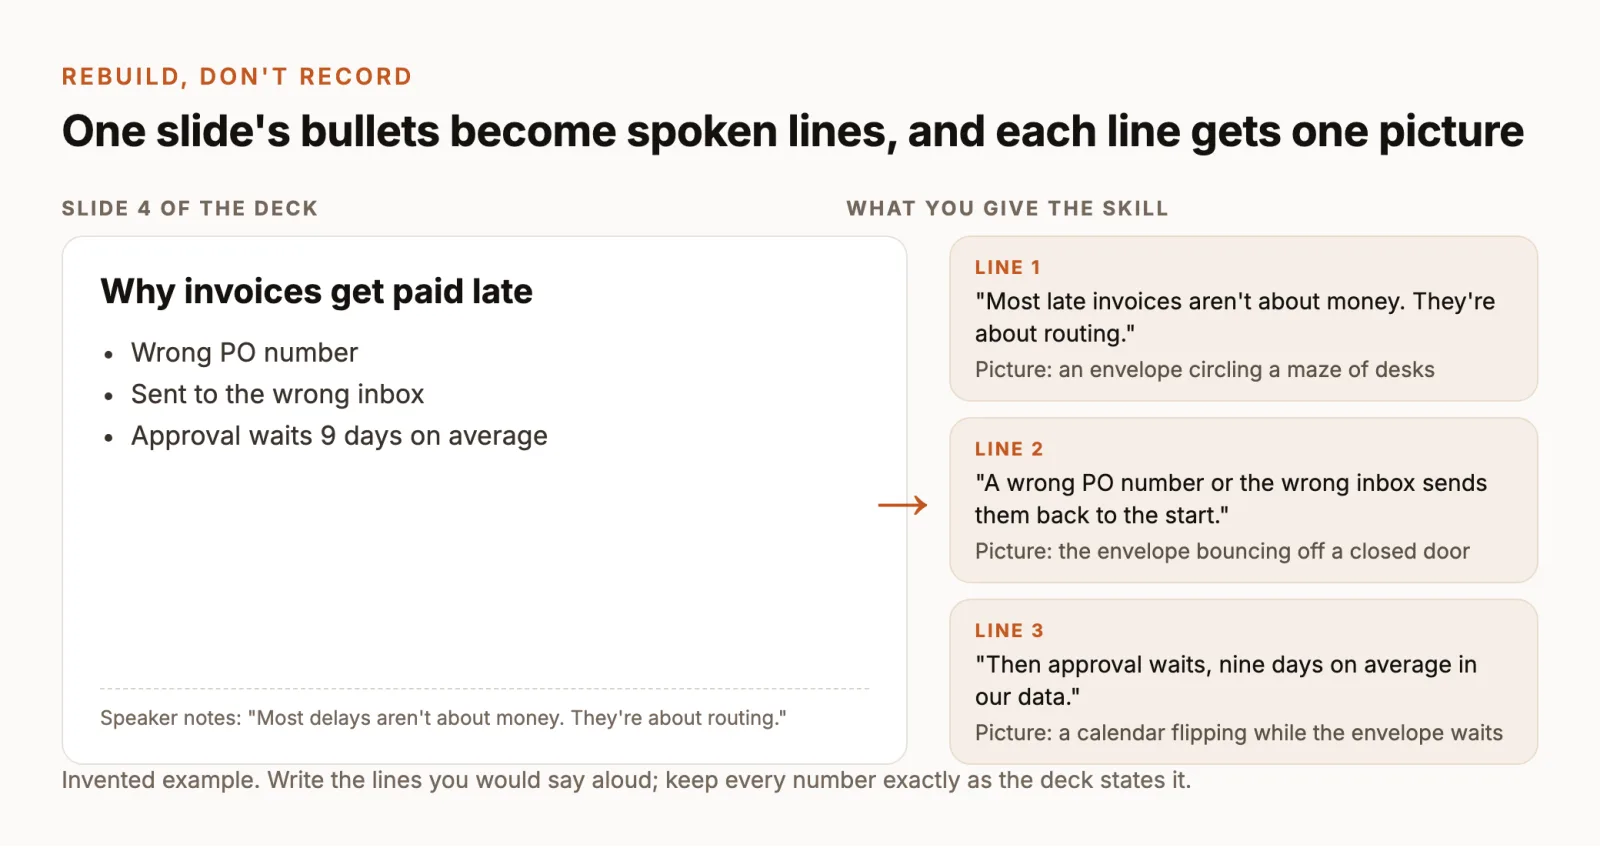
A native export reproduces the deck, so its weaknesses come along. A slide of six bullets on screen for 40 seconds is hard to watch, and a voice reading the bullets aloud doesn’t fix it. If the video is going to customers, students or new hires who never saw the talk, rebuilding the explanation often works better than exporting it: each spoken line gets its own picture, and nothing sits still for long.
The work starts with the script, not the slides. Turn each slide’s point into the lines you would say aloud, and note one picture per line. Keep every number, name and claim exactly as the deck has it. Our guide to making an explainer video without After Effects covers script structure and pacing in more depth.
In ChatCut, the animated explainer Skills take a topic or a full script and make a complete narrated animation in one visual style. ChatCut doesn’t import .pptx files, so bring the content in as text and images:
- Prepare the inputs. Copy your script into a text file. If charts or product shots must appear, save those slides as PNG images: File → Save As and PNG on Windows, File → Export and PNG on a Mac, or Download As JPEG images on the web (Microsoft’s guide to saving slides as images).
- Add reference images. In a ChatCut project, open My Assets → Upload → Files… and add the slide images you want reused.
- Choose a style. Select the book icon below the AI composer, search for the style and choose Use this Skill; the Skills docs show where everything is. Confirm the Skill appears as an attachment in your message.
- Paste the prompt below, then your script, and send it. Review the scene list before anything is generated.
Check the scene list against the deck before you approve it: the order, every figure and every name. Generating scenes, voiceover and animation uses ChatCut credits, and asking for the plan first means you only pay for scenes you’ve agreed to. Uploading, editing and exporting don’t use credits.
Whiteboard drawings suit lessons and step-by-step processes. For a product introduction or brand training, Pastel Flat 2D gives a cleaner flat look in soft colors. For opinion pieces, culture topics or visual notes, Paper collage builds scenes from paper textures and cutouts. The same prompt works with any of them.
If you’d rather keep the exported PowerPoint video and just tidy it, import the MP4 instead and ask for that edit:
When the video is ready, choose Export → Video and H.264/MP4. In the browser, cloud rendering goes up to 1080p; ChatCut Desktop renders on your computer and can export 4K.
Check the video before you send it
Play the exported file in a normal video player, not inside PowerPoint or Keynote, and watch the first slide, a slide from the middle and the last one with sound on.
- No narration. The export used fixed timings. Choose Use Recorded Timings and Narrations and export again. On a Mac, check that your version is 16.19 or later.
- Narration cut off at slide changes. You talked through a transition. Re-record that slide and pause before advancing.
- A video or audio clip is missing. It was linked rather than embedded, or it’s a format the export drops. Update the media (Windows: File → Info → Convert) or re-insert it.
- Animations didn’t play. Likely a Mac export. Try Windows or Keynote, or rebuild the motion.
- Slides flash past or drag. Set per-slide timings with Rehearse Timings instead of one fixed length.
- Viewers watch without sound. Add captions. Our subtitle guide covers burned-in captions versus a separate SRT file.